 Baby's dream furniture
 Baby's dream furniture
 Baby's dream furniture
 Baby's dream furniture
 Baby's dream furniture
 Baby's dream furniture
 Baby's dream furniture
 Baby's dream furniture
Baby's dream furnitureBaby's dream furnitureBaby's dream furnitureBaby's dream furnitureBaby's dream furnitureBaby's dream furnitureBaby's dream furniture
Baby's dream furniture
Baby's dream furnitureBaby's dream furnitureBaby's dream furnitureBaby's dream furnitureBaby's dream furnitureBaby's dream furnitureBaby's dream furnitureBaby's dream furniture
 Awesome creative stairs
 Awesome creative stairs
 Awesome creative stairs
 Awesome creative stairs
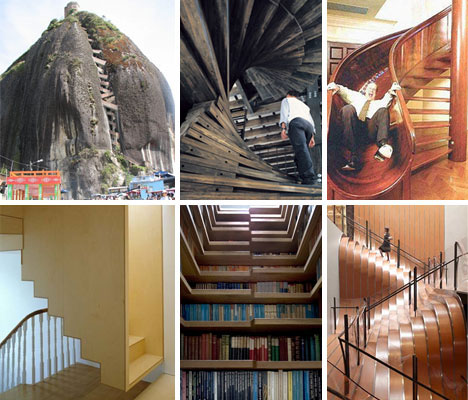 Awesome creative stairs
 Awesome creative stairs
 Awesome creative stairs
 Awesome creative stairs
 Atoll Sofa Wall Bed
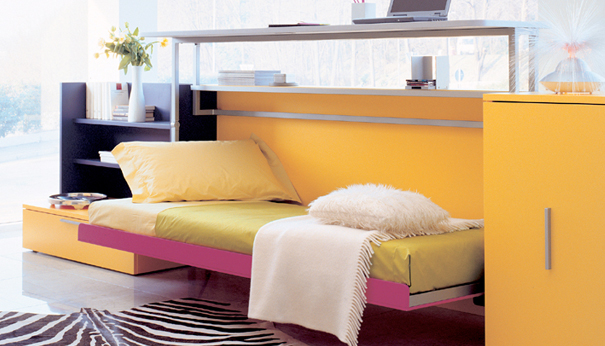 Atoll Sofa Wall Bed
 Atoll Sofa Wall Bed
 Atoll Sofa Wall Bed
 Atoll Sofa Wall Bed

 Apartment interior Designs
 Apartment interior Designs
 Apartment interior Designs
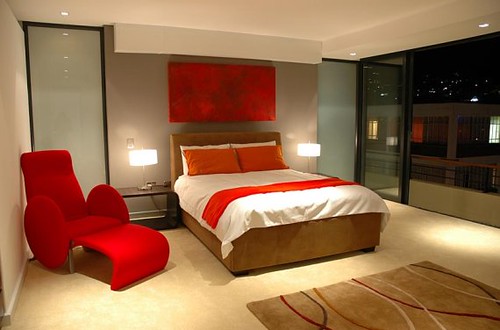 Apartment interior Designs
 Apartment interior Designs
 Apartment interior Designs
 Apartment interior Designs
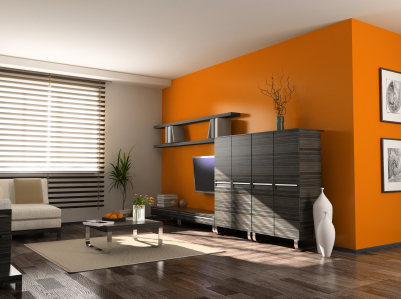 Apartment interior Designs
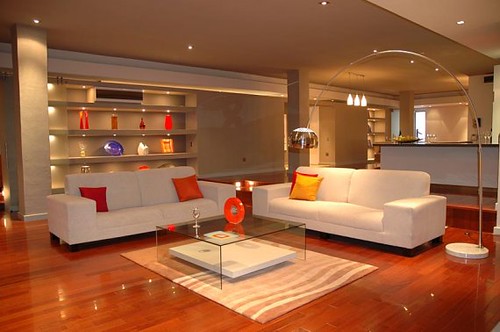 Apartment interior Designs


This is luxury bathroom design ideas, specialize in bathroom designs and furniture. Everything they made is full of harmony, beauty and luxury. If you want create not just beautiful but also unique bathroom which you can be proud of than getting ideas from Axor will help you a lot.

Luxury Bathroom Design from Axor 
Luxury Bathroom Design from Axor
Luxury Bathroom Design from Axor
Luxury Bathroom Design from Axor
Luxury Bathroom Design from Axor
Luxury Bathroom Design from Axor
Luxury Bathroom Design from Axor
Luxury Bathroom Design rom Axor
Luxury Bathroom Design from Axor
Luxury Bathroom Design from Axor
For further information about this Luxury Bathroom source our Blog at www.hostinteriordesign.co.cc
Although home theatre speakers greatly enhance the sound quality of your movies and music, they can detract from the look of an otherwise well decorated room. Here are some ideas you can use to create innovative speaker shelves that will be a lot more attractive than seeing a black box stuck to the wall.

If you have small speakers, you can camouflage them by painting the walls and the speaker mounts the color of the speakers. Of course, this seriously limits your decorating choices, but if you like the idea of a white, black, or gray wall, this will work. Simply cut a piece of plywood roughly the same size as the speaker that will sit on it. Screw a smaller supporting block into the wall just below where the speaker will sit. Then take your shelf, and screw it into your supporting block. Paint the wall and your homemade shelf to match the speaker.
You can use beautiful decorative wall sconces to hold your speakers. They come in many shapes sizes and styles. You can find wood or plaster sconces with details or cherubs and angels. You can find antique weathered sconces shaped as acanthus leaves. You can also use African motif carved sconces carved from rich ebony wood, or you can choose gilded floral sconces. Any of these will detract from the boring square speaker by drawing attention to it-self.
You can hide your entertainment center speakers. Install them into the wall by cutting out a piece of drywall the size of the speakers. Install a small’s shelf between the studs to hold the speakers. Then hang a lightweight sheer fabric painting over the speaker. You can make such a speaker cover yourself purchasing simple wooden picture frames without the glass and sheer pieces of fabric that can double as art. Staple the fabric into the frame making sure it is taut. You will have instant art and speaker covers at the same time. You may want to use a deep picture frame like a shadow box. You can also hide your speakers by purchasing wall mounted flower baskets and placing the speaker amongst the fake flowers. Just make sure no one tries to water the flowers.
You can show off your speakers by placing them on floating shelves. They are available in many styles form a simple piece of glass, to a plate ledge, to a square block on the wall. There is an infinite number of finish choices that will go well with any design style.
Another option for creating innovative shelving for your speakers is to make it a part of an art collage. It can be mounted on the wall in the midst of sculptures, pictures, and empty picture frames. It can even be mounted inside of an otherwise empty picture frame. A fun idea would be to place it on a shelf amongst a collection of different boxes. Choose wooden boxes, leather boxes and metal boxes to display your speakers along side. Even you will have trouble figuring out which item is your speaker from a distance.
What young girl does not want to have a pretty, dreamy room filled with butterflies? It is simple to create one for her, using your imagination and a few simple crafts. The furniture, bedding, and other decorations can be easily coordinated to make your child’s room attractive and the room of her dreams.

It is very important to get your child’s input about the room redecoration. She should feel like her ideas are part of the room, and depending on how old she is, allow her to help with the painting, sewing or other crafts as well as choosing accessories.
Color is very important to little girls. Talk with her about what color the butterflies in her imagination are. Some girls will go with pastels, choosing pink and lavender for their walls and fabrics. Others will see their butterflies in bright shades of yellow, red and blue. The possibilities for her wall colors are endless. Pastels will make the room seem soft and dreamy. Another choice is to paint the walls a pretty blue that matches the sky or still another choice is to pain the walls white and stencil colorful butterflies flitting about the room. Stencils are easy to use. Or, you can go with a border that features butterflies in the colors of her choice. Perhaps you want to wallpaper the entire room or even one wall with an attractive butterfly print. Wallpaper is usually easier to do with two people, so enlist some help if that is your choice.
The color of the carpet can add to the room’s charm and theme, as well. Choose a green the color of grass or a rosy pink that complements the walls. If you would prefer something more neutral, a soft gray or nice taupe will not detract from the room’s overall theme. Keep in mind that little girls tend to be less hard on things like carpet, so you don’t have to shy away from lighter colors.
Choosing furniture is a matter of taste and price range. Classic white furniture always looks good in a girl’s room, and it will match with any room redecorations that are done in the future. For the girl who prefers pastels, maple furniture with a whitewash finish will add to the softness of the room. Try to pick dainty pieces that underscore the fragility and beauty of butterflies. Don’t go for the heavy, dark cherry stain on her furniture. A canopy bed is the heart’s desire for many girls, and there are white metal beds that have a butterfly shape in the head and footboards. Replace the handles and knobs of her furniture with butterfly shaped ones, or dainty porcelain or brass knobs and pulls. These can be found at any larger home center store.
A bed in a bag set that coordinates the sheets, comforter, canopy cover and curtains will really pull the room together. If you can’t find a set in the colors you have chosen, consider making them yourself. A good fabric store will have patterns and all the necessary fabric and notions you will need. If you have questions, the salespeople in fabric stores are usually quite knowledgeable about sewing. It is easier than you think to sew, and if you’ve never done it before, give it a try. You might be surprised at the results! Other window treatment choices can include a puffy valance with sheer white curtains to flutter in the breeze. Choose a matching gingham valance and a plain colored comforter and you can accent with butterfly accessories instead of having butterflies on the bedding and curtains.
To continue the butterfly theme, purchase a wastebasket shaped like a tulip or decorated with butterflies. On the frame around her mirror, glue small, nylon butterflies in various colors around the edge. These can be found at any craft store. A plain lampshade can be turned into a very attractive one by covering the lampshade with matching fabric and gluing decorative strand of beads from the fabric store to the inside edge of the lampshade. Scatter butterfly shaped pillows over the bed and find a large butterfly shaped rug for the center of her floor. Cut a simple butterfly shape out of wood and paint it in the colors she has chosen and attach it with glue to bookends for holding her books on a shelf or desktop. A corkboard frame can be covered with foam butterflies that can also be found at craft stores. A set of plain, stacking bandboxes in graduated sized can be painted and appliquéd with butterflies to hold toys or other items out of view.
By simply working around a central theme and color scheme, a decorative and functional room can be created for your child to dream, play and grow in.
When homeowners decide to invest in building a home theater, they carefully research the electronic devices available. This is a smart move, considering that inferior audio equipment results in poor sound quality. However, people often forget that even the finest speakers will not produce good acoustics if the room is not sufficiently prepared. This is because sound waves reverberate off bare walls and floors, creating an unpleasant echo. For this reason, it is vital to do your homework before choosing home theater carpeting so that nothing will keep your residential cinema from performing optimally.

Carpet in the home theater serves many purposes. Far from just being a plush treat for the feet, it also absorbs audio within the room, insulates from sounds outside, and dictates how difficult cleaning will be. In order to understand which carpet to choose, you need to understand how sound behaves within the home theater. When audio waves exit the speakers, they are projected into the room. Since a home theater is designed to have “surround sound,” the cinema-like experience of feeling like you are in the movie, speakers are located throughout the room. A sound wave moves invisibly until it encounters an opposing force. What this force is greatly affects what the wave will do next. For instance, audio waves that hit a reflective surface (like a smooth wall) bounce off and head back into the space. If this happens, they will eventually meet other bouncing waves. This interferes with proper sound quality since rebounding dialogue sounds fuzzy and echoing music or background sounds are warped.
In other words, in order to experience movies in your home theater optimally, it is necessary to remove the majority of reflective surfaces. Carpeting will absorb sound waves that reach it, allowing each bit of audio to be heard and then essentially disappear. Used in conjunction with padded furniture and curtains, the right kind of carpet will perform much the same as expensive theater insulation without the high cost. However, the avid home theater buff will not be satisfied with the ugliest discount carpet they can get their hands on. Aesthetics are as much of a concern as are acoustics. If you have gone to great lengths to mimic an old-fashioned cinema, installing theater-style chairs and movie posters, you will not want to neglect the appearance of your flooring. Several carpet companies cater to the whims of home theater enthusiasts, offering replicas of movie house carpeting to all consumers. A quick search of the internet will reveal carpet decorated with movie reels, tickets, buckets of popcorn, and several other classic designs.
Of course, the price of these items cannot be ignored. Novelty carpets, generally sold in large quantities to commercial theaters, are not as affordable when only a 10’ x 12’ amount is needed. In fact, it could easily cost between $500 and $1000 to carpet an area this size with specialty flooring. Some home theater builders proudly quote their “spare no expense” motto, but others are working on a budget that electronics largely consume. For this reason, it may be useful to know that your local carpet store offers a selection that will suit the acoustic needs of a theater. In short, what you should look for is a stain-resistant brand with a tighter weave. A darker color is best, both because it will disguise stains and because it will not detract from the darkness during viewings. People of all ages are notorious for spilling their refreshments during movies, which is why most modern theaters have hard flooring in the viewing area. If your carpeting is ultra fluffy, it will hold onto every crumb and candy piece no matter how much you vacuum. If you follow these tips, you will save yourself the trouble of picking up food by hand and scrubbing soda stains endlessly.
No matter where you purchase you carpet from, keep in mind that it will have to be professionally installed. Even die-hard do-it-yourselfers lack the skill and expensive tools necessary to stretch carpet. Make sure that thick padding is laid and stapled down beneath your chosen carpet, keeping in mind that this usually costs extra. If you wish to carpet the walls for acoustic purposes, ask you installer if they can do this. The procedure is more difficult than that for covering floors and may incur additional fees. It may be best to take them on a walk-through of the theater before paying for anything. At this point, measurements can be taken and cost estimates given. This way, you will not be hit with a financial surprise afterwards because you were not aware of additional fees.
By carefully considering your options, you can choose the best carpet to fit your space and budget. Obviously, the audio benefits of laying carpet in the home theater are the most obvious. Still, the convenience, beauty, and affordability of your flooring all contribute to how much you enjoy your movie viewing experience. When combined, all of these advantages make the careful choice of which carpet to lay well worth the effort.
You’re off to the paint store to choose your paint, but how will you know whether to choose flat latex paint or semi-gloss? Does the surface of your walls matter in selecting your paint? Well, that depends upon what look you want for your living room, bedroom or kitchen. You may want to use a different finish for each room to suit the lighting and decor for that particular area. The most popular choice for interior surfaces such as walls and ceilings is latex. It’s water based, dries quickly, cleans up easily and is low in odor. Your other choice, oil-based paint, has a strong odor, takes a lot longer to dry than latex and solvents must be used for clean up.
 If your walls have several nicks, your best bet is to choose flat latex wall paint to hide imperfections in the surfaces. Dents and dings in the walls are more prominent when you paint with a glossy finish. Although flat latex paints have previously been challenging when it came to removing some stains, new formulas have provided a finish which resists stains better and provides prompt clean up. These new products are usually washed simply with water and won’t fade the finish. Latex flat wall paint is perfect for ceilings, closets and areas with less traffic. The flat latex paint prevents glare from the light fixtures from bouncing off the ceilings, giving the room an uncomfortable glare. Because of this, latex flat finish lends a more romantic glow to formal living rooms and dining rooms.
Latex flat paint comes in a variety of colors that brighten or darken the room in question. For a sunny effect, choose colors ranging from white or yellow to pink or red. When darkening a room, select a dark blue, green or brown. If your room was originally a dark color, you can choose another dark color to cover it up, or primer and paint any color you wish. Allow two coats of primer, maybe even three if the room was originally very dark. Also allow two to three coats of the paint for a fabulous finish. You can also easily add modern touches like swirling or sponging to your walls, since each coat dries so quickly. When choosing colors, take a small snip of fabric from your sofa’s hem, or carry a swatch with you to match with the color. Also, if your room is small, you won’t want to select a dark color, which will make the room appear even tinier. If the room is massive, it could appear cozier if you apply a medium to dark shade of the latex. Don’t be afraid to use different colors in combination. Painting three walls in one color and the fourth wall in another shade adds uniqueness to the room. Or, paint the room all one color, then choose a bolder color to accent the molding.
If you begin applying the paint and realize it’s too dark, there are steps you can take to correct this. First of all, let it dry overnight. Many paints will lighten as they dry. If you decide that the color is still too dark, you can have new paint mixed, or purchase a paint that will lighten the existing color. For instance, if you purchase a lovely shade of blue, but after painting a wall section you see it’s really navy, you can purchase a gallon or so of white to lighten it. White latex is suitable for lightening all different colors. Or, if your color is not quite dark enough, purchase a gallon of a darker shade to mix in with the current. Arriving at just the right color shouldn’t be a guessing game, though, so try to select a color that will go well with your decor, but not be so bold as to take away from the feel of the room.
You can find latex flat wall paint in department stores, specialty paint stores or even markdown stores, but what brand you choose may impede your progress. Select a reputable brand when purchasing flat latex wall paint. There are many varieties, ranging from cheap to expensive, but choosing a brand that has been around for years might prevent runs from thin paint. A popular brand of paint might also hold up better, saving you money in the long run. Ask at the paint store or research a few brands to decide what paint will give you the best results.

Creating a window treatment can be a lot of fun, and is not the difficult task many people think. In fact, one does not have to be a master interior designer to come up with a window treatment that is original, tasteful, and pleasing to the eye. The process can actually be very simple.
Cornice boards, despised in the seventies and eighties, are back in vogue for the new millennium. The great news about cornice boards is they do not have to be the heavy wooden boxes with all the intricate carving of yesteryear. In fact, they don’t have to be made of wood at all.
Today, cornice board kits are available which include basic components made of Styrofoam. These pre cut pieces are ideal to use when the object is to create a padded cornice board. After assembling your Styrofoam frame according to the kit’s instructions, cover the frame with batting. Rolls of batting can be purchased at any craft shop and many discount stores. To secure to the frame, try some fabric glue and perhaps a staple or two. The use of hot glue is discouraged, as it can melt the Styrofoam, leaving your frame distorted and less sturdy.
When deciding on the fabric to cover your cornice board, take a look around your room. Consider the color of the walls, the grain of any of wood in the room. What minor colors in the upholstery, pillows, or carpets could you pick up for the window treatment? Along with the color scheme, what types of fabrics are present in the room? How many varying textures, weaves, and blends are already represented?
Once you have determined the color and texture of the fabric for the cornice board, lay the fabric flat, and place the cornice board frame on the fabric. Make sure you cut a piece of fabric that will allow you to completely cover the cornice board, with the seam visible only on the inside of the board. Carefully used a staple gun or fabric glue to secure the fabric, making sure the material remains taut and smooth. To further dress the exterior of the board, you may choose to attach roping to outline the edges of your cornice board. Fabric glue will allow you to do this without any actual sewing.
Creating a dramatic series of layered panels to go along with your cornice board can also be fun. Just as with the selection process for the material used on the board, turn to the elements in your room for cues on what types of fabrics, colors, and textures will work well in your panels. Generally speaking, you can create a dramatic layered look by using a series of panels of different lengths in conjunction with the cornice board. A suggestion would be a three tiered look for the panels. In order for the panels to seem to flow effortlessly from the cornice board, consider this arrangement of textures: begin a heavy fabric panel as the top overlay, a slightly less heavy panel for a middle overlay, and then something thin or sheer for the underlay panel. Allow about a third of each panel to be exposed, going from cornice board to floor.
There are a couple of ways to successful have this multilayered look. One would be to create each panel by sewing the three pieces together at the top, include an open hem for the curtain rod at the top, and then hem each piece of the layered panel to the appropriate length. Alternatively, you can achieve a true layered look by using a triple curtain rod set, placing one set of each of the panels on each successive road. A third means of achieving the look would be to use a double curtain rod for the middle and bottom panels, and securing the top panel to the cornice board itself.
When assembling this multilayered treatment, don’t be afraid to be a little adventurous. Grab samples of anything you think might work in the room. Lay out a template on a work table or the dining room table and then spend a little time trying different texture and color combinations. Keep going until you find a combination that feels and looks good.
Once your panels are prepared, hang them first. Next, attach the cornice board to the window casing using the hardware that came in your kit. Finally, step back and arrange the panels to your liking.
Remember, there is no inherently perfect way to dress a window, so feel free to express yourself and come up with something that is right for you and your room. The end result will be something you can enjoy each and every day.
When one thinks of the word “retro”, their mind automatically goes to the decorating styles of the 1960’s and 1970’s. For more and more people, however, the 1980’s is also considered retro. Here are some ideas you can use to create a retro bedroom for yourself.
.
The 1960’s was the time of hippies, and free love. Even more than that, it was a time for people to discover love of their fellow man with the emergence of Martin Luther King, Kennedy, and war protests. Home décor was as bold and free as the youth of the generation.
Walls: Room décor did not necessarily come from wall colors. They came from what was hung on them. On your white or neutral wall colors, hang colorful bold flower print fabrics in two or three colors.
Fabrics: Use bold color blocked fabric for your bedding and window treatment. For example, a white background with orange circles or uneven squares. Colors to look for are orange, brown, white, celadon green, and mustard.
Flooring: Floor tiles were very popular during this time. Purchase floor tiles in two colors and install like in a checkerboard pattern. Add several throw rugs to warm your feet in the morning.
Accessories: Accessorize the room with pop art reminiscent of Andy Warhol who was famous for his paintings of Campbell’s soup and Marilyn Monroe. Lava lamps and Hawaiian tiki carvings are also great room accessories of the time.
As the baby boomers came of age in the 1970’s, free love, war protests, and overall cultural awareness faded as disco and nightclubs became the obsession of the generation who needed to work off steam as they worked themselves up the corporate ladder. Home décor and fashions evolved greatly during this time from wild and crazy to clean lines, but bold colors remained.
Walls: Paint the room in a two-toned design like a beige on top and brown on the bottom. Two tones of any color will work well.
Fabrics: Floral designs continued to remain dominant, but more colors were added to the color palate. For your bed, purchase a cozy chenille bedspread and matching sheer curtain panels for your windows.
Flooring: Shag carpet would look great in your 70’s inspired bedroom, but you do not need to stick with the mixed shades of brown that was used to camouflage spills. Purchase your shag carpet in solid colors instead, and stick to area rugs to save money because shag carpet does not have a long shelf life.
Accessories: Mirrors and glass became the main room accessories during this period. Cover a wall with mirrors and add a mirrored disco ball to reflect the light in your room.
During the 1980’s the baby boomers became parents and so home décor became more grown up. Patterns became more subtle, subdued, and traditional. Victorian elements re-emerged during this time.
Walls: There was a return to white and neutral colored walls. You can paint your 1980’s inspired bedroom walls white with pastel colored trim, or antique white with high gloss white trim.
Fabrics: Pastel colors became the popular color scheme during this period interspersed with subtle florals by designers like Ashley Stewart. For a more masculine room, stick with classic stripes and argyle patterns.
Flooring: During the 1980’s, carpet got colorful and shorter. Short twisted pile carpet in pinks, blues, and greens would work well in your room.
Accessories: Accessories during this period were also a bit more grown up. Glass figurines became popular for adults and hand made bunnies and stuffed animals were the main décor in children’s rooms. Photography became the wall hangings of choice from candid pictures of family members to posters of rock stars, to black and white landscapes by photographers like Ansel Adams.


